Every user strives to have a reliable and fast network connection when using the Internet. That's why it's important in testing to focus on checks that simulate non-functional or unstable internet connections. For this purpose, there are specialized tools that help corrupt your network, but in a controlled and interactive way. In this article, we will look at one such tool called Clumsy.
Testing with Clumsy
- 04.10.2023
- Posted by: Admin
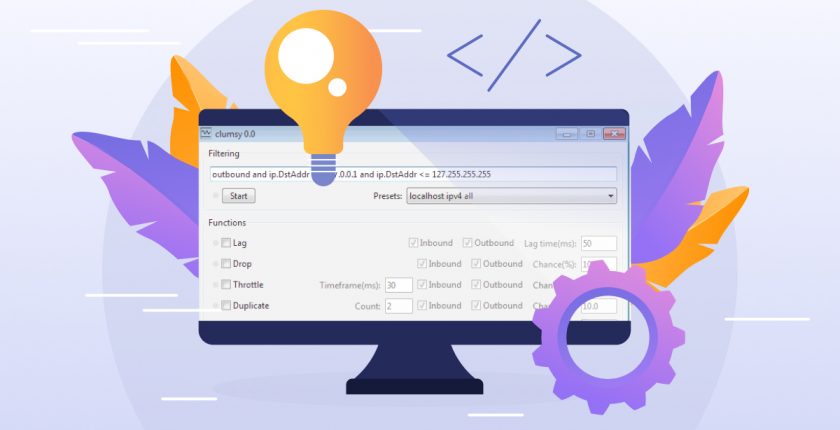
Clumsy is a program designed for Windows OS capable of simulating a poor-quality network connection through packet loss. It is free and available for both 32-bit and 64-bit OS versions.
It is necessary to get acquainted with some important concepts of network technologies to understand the principle of working with Clumsy.
Data packets. Packet loss
In short, the essence is that any request made over the Internet is sent in the form of data packets – from browsing web pages to downloading files. When packets don't reach the final destination during network communication, it's called data packet loss. Usually, this is associated with low network bandwidth, but there can be other reasons.
Working with Clumsy
Installing the program is quite simple and fast, so it does not require special knowledge. Clumsy can be downloaded using the provided link. After installation and launching the program, the following window opens.
Set a rule from the «Presets» dropdown menu in this window, in the «Filtering» section. Depending on the selected rule, the description for that rule will automatically appear in the line, which can be edited if necessary.
The available rules and their default descriptions are given in the table below:
| Rule | Description |
localhost ipv4 all :
|
outbound and ip.DstAddr >= 127.0.0.1 and ip.DstAddr <= 127.255.255.255
|
localhost ipv4 tcp :
|
tcp and outbound and ip.DstAddr >= 127.0.0.1 and ip.DstAddr <= 127.255.255.255
|
localhost ipv4 udp :
|
udp and outbound and ip.DstAddr >= 127.0.0.1 and ip.DstAddr <= 127.255.255.255
|
all sending packets :
|
outbound
|
all receiving packets :
|
inbound
|
all ipv4 against specific ip :
|
ip.DstAddr == 198.51.100.1 or ip.SrcAddr == 198.51.100.1
|
tcp ipv4 against specific ip :
|
tcp and (ip.DstAddr == 198.51.100.1 or ip.SrcAddr == 198.51.100.1)
|
udp ipv4 against specific ip :
|
udp and (ip.DstAddr == 198.51.100.1 or ip.SrcAddr == 198.51.100.1)
|
all ipv4 against port :
|
ip.DstPort == 12354 or ip.SrcPort == 12354
|
tcp ipv4 against port :
|
tcp and (tcp.DstPort == 12354 or tcp.SrcPort == 12354)
|
udp ipv4 against port :
|
udp and (udp.DstPort == 12354 or udp.SrcPort == 12354)
|
ipv6 all :
|
ipv6
|
There is a «Functions» area in the Clumsy query settings window, where you can select setting parameters for future network tests.
The following functions are available in the settings:
- Lag – simulates network delay for a time specified by the user in milliseconds.
- Drop – reduces the percentage of data transmission packets as specified by the user.
- Throttle – blocks the traffic for a certain period of time, then resumes the data transmission in packets.
- Out of order – changes the order of data packets.
- Duplicate – allows sending duplicate data packets following the originals.
- Tamper – distorts /replaces the content of data packets.
So for the Throttle function, it is possible to specify time frames in addition to the likelihood of what will happen, for Duplicate - you can specify the number of packets to be duplicated, and for Tamper - you can repeat the checksum of packets with altered content.
These aforementioned functions and their settings can also be combined.
Once the necessary conditions for degrading the network are set, click the «Start» button to begin disrupting the normal network operation.
Let's take a closer look at the settings of each of the above functions.
Lag. Delay Simulation
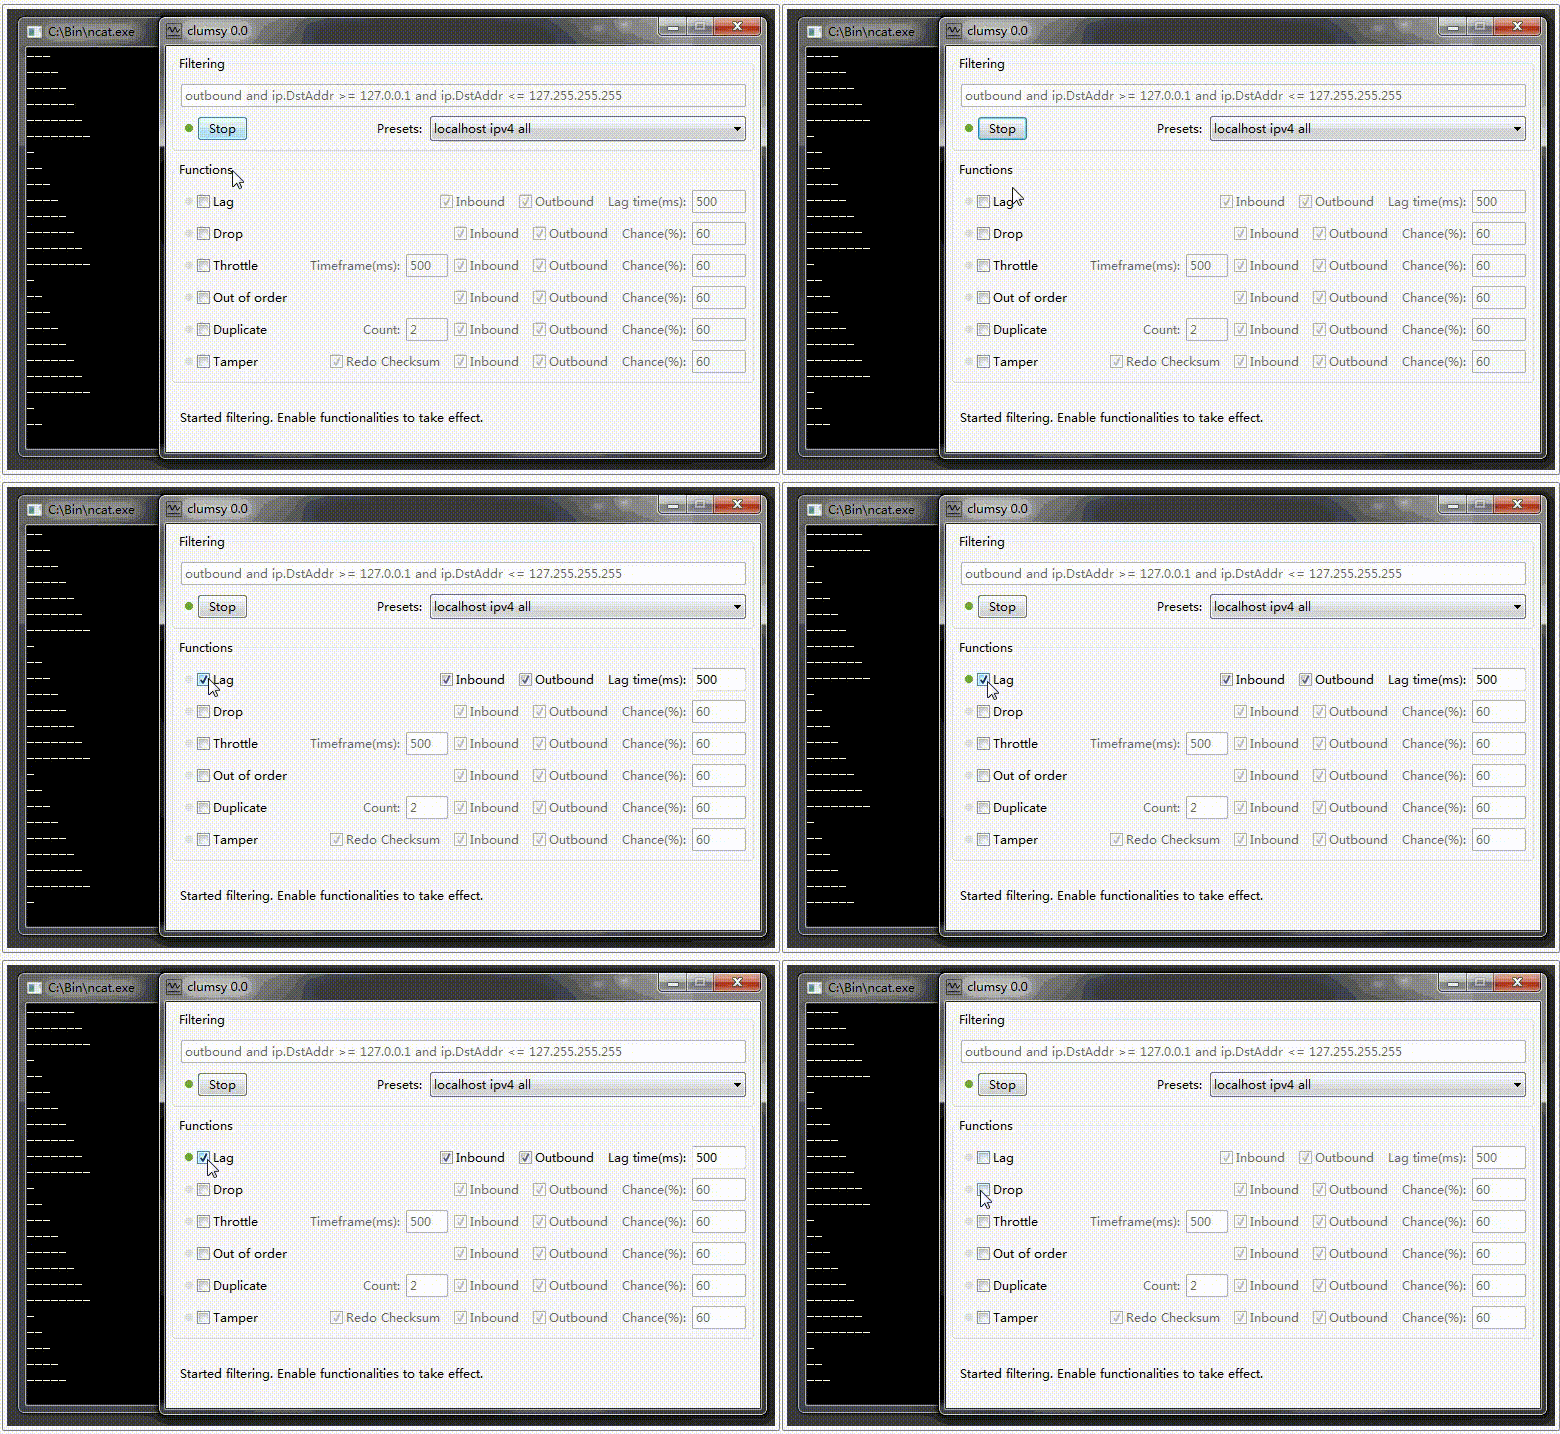
To simulate delays during packet transmission, activate the «Lag» checkbox and set the delay value in the «Delay(ms)» field. Also, activate the necessary checkboxes based on the required packet transmission checks, «Inbound» for incoming and «Outbound» for outgoing packets. An example of how the delay simulation works in sending packets is shown in the video below.
Drop. Simulation of Data Packet Loss
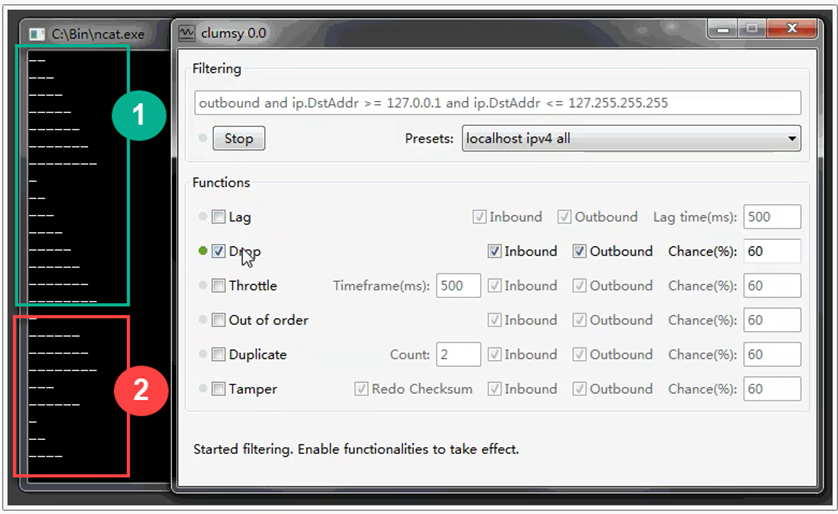
The «Drop» function involves the loss of some data packets. To apply this function, you need to activate the «Drop» checkbox and set the percentage value of the amount of data lost in the «Chance(%)» field (the higher the value, the more data will be lost during transmission). Just like in the previous option, activate the necessary checkboxes depending on the required checks for data loss during packet transmission, «Inbound» for incoming and «Outbound» for outgoing packets.
In the example provided below, activating data loss results in the loss of some data from the complete set, represented by number 1, sending only a portion of packets according to the indicated percentage of loss.
Throttle. Simulation of blocking and restoring packet transmission
The «Throttle» option is used to simulate the transmission of a large volume of packets with a set of all traffic over a specified time interval, and then transmitting them in one batch. It sets the percentage value of the number of such data batches transmitted in the «Chance(%)» field (the higher the value, the more data will be transmitted in a single batch). Similarly to the previous options, activate the necessary «Inbound» and «Outbound» checkboxes. There's an additional parameter «Timeframe(ms)» = 500, which specifies the timeframe within which the process will occur.
In the example below, in the screenshot on the left, under A-1, the initial data set is marked, and under A-2, the data set is transmitted as a batch of several packets. In the screenshot on the right, under B-1, the initial data set is marked, under B-2, the data set previously transmitted as a batch of several packets, and under B-3, the data set transmitted by the current batch of several packets.
Out of order. Simulation of packet order change.
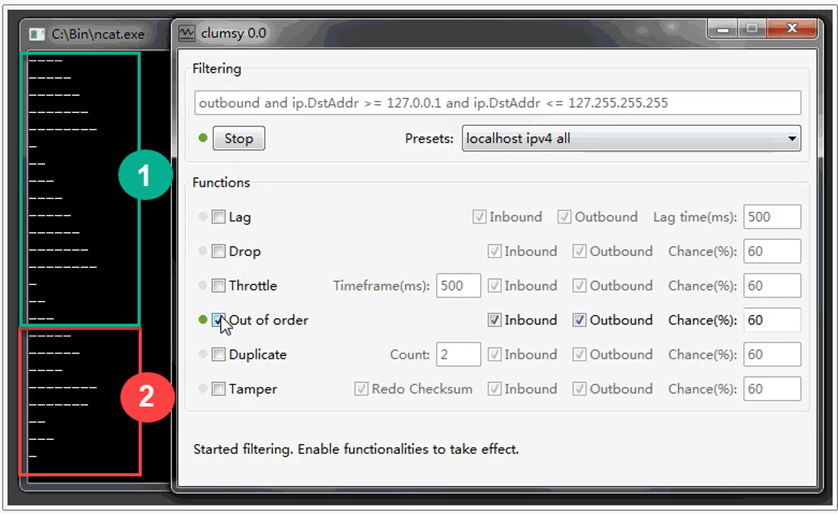
To simulate the out-of-order transmission of packets, you need to activate the «Out of order» checkbox and set the percentage of packets whose order of transmission will be changed in the «Chance (%)» field (the higher the value, the greater the changes in the order of data transmission). Also, activate the «Inbound» and «Outbound» checkboxes.
In the example below, under the number 1, data transmission is represented in order, under the number 2, packet transmission occurs out of the established order of their transmission. The order was changed for 60% of the packets.
Duplicate. Simulation of duplicate packet transmission
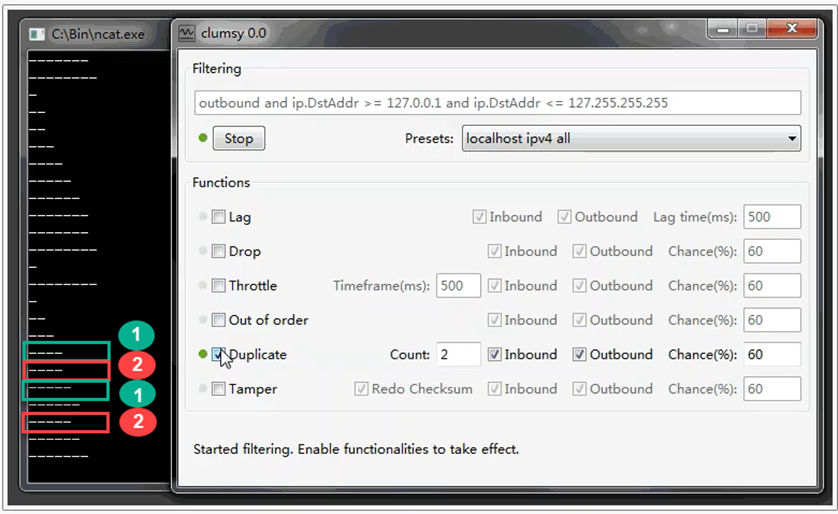
To simulate the transmission of duplicate packets, you need to activate the «Duplicate» checkbox and set the percentage value from the total number of packets that will be duplicated in the «Chance (%)» field (the higher the value, the more packets will be duplicated). In the «Count» field, specify the number of repetitions of the same packet transmitting. Also, activate the «Inbound» and «Outbound» checkboxes.
As shown in the screenshot below, the main packets being transmitted are indicated under number 1, while duplicates of already transmitted packets are indicated under number 2. Sometimes, due to timeouts between packet transmissions, duplicates of already transmitted data may not be transmitted immediately after the original packet, but after some time, as you can see it in the lower red rectangle labeled 2.
Tamper. Simulation of distortion/substitution of data packet contents.
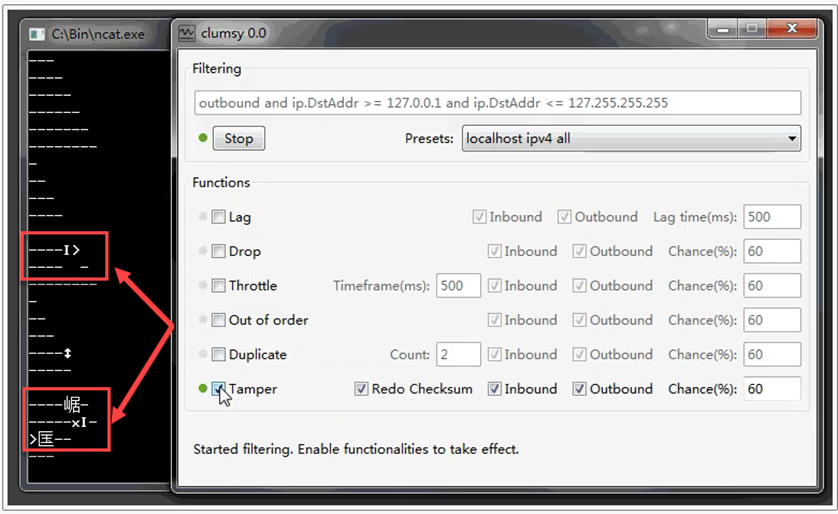
The simulation of transmitting corrupt packets is carried out by activating the «Tamper» checkbox, for which you need to set the percentage of corrupt packets from the total number in the «Chance (%)» field (the higher the value, the more packets are corrupted). To ensure that the total number of transmitted packets remains consistent with the sum of intact and uncorrupted packets, there is the «Redo Checksum» parameter. The «Inbound» and «Outbound» checkboxes are marked similarly to the previous options.
You can see the fragments of corrupted data in the screenshot below.
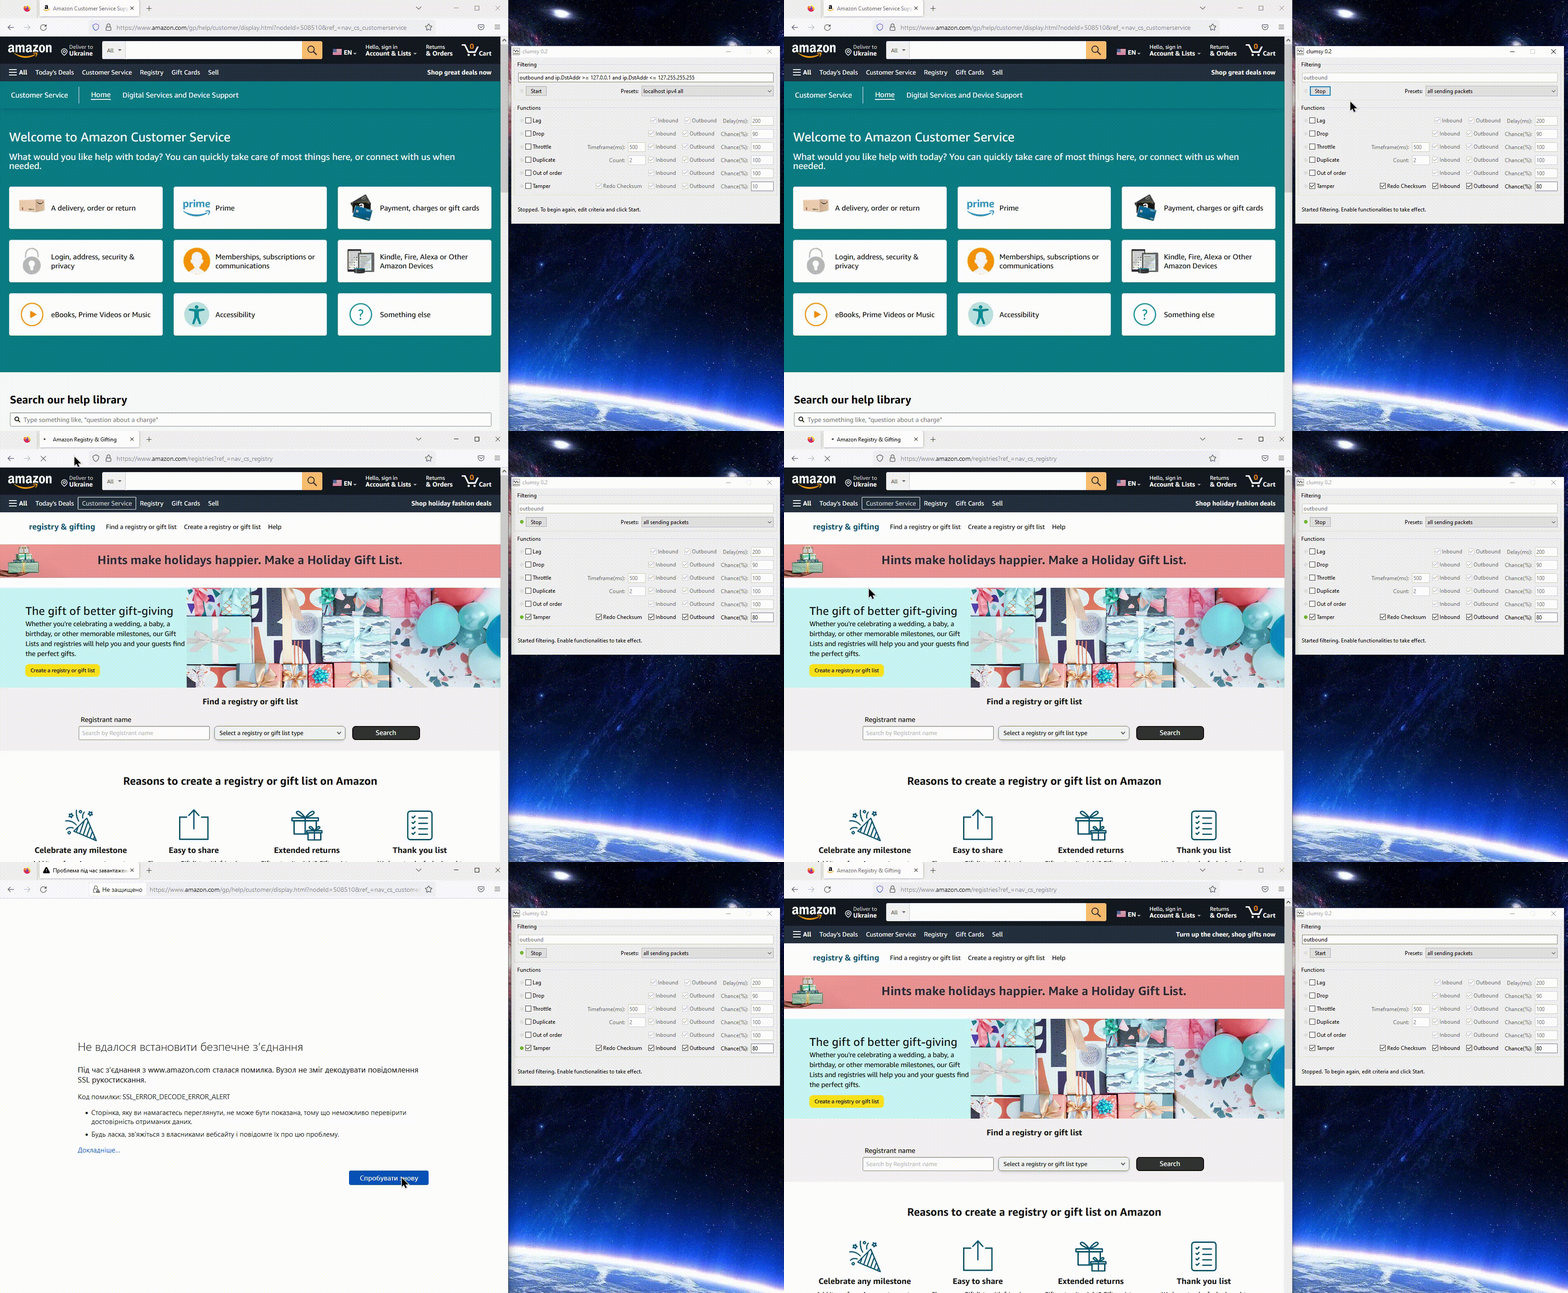
Let's consider how Tamper works using the actual website called Amazon. So, open the website and make sure that the speed is normal and the network is sufficiently stable by refreshing the website page.
After that, launch Clumsy, and select the «all sending packets» rule, after which the rule description will be displayed by default. Next, check the «Tamper» checkbox, «Redo Checksum», «Inbound», and «Outbound» checkboxes will remain unchanged. For the «Chance (%)» parameter, set the value to 80, for example, and then click the «Start» button to begin the test. After that, when moving to the «Registry» section, the page loads quickly. This is because the «Chance (%)» parameter was not set to 100%, but to 80%, which reduces the likelihood of the program affecting the network. However, when the next transition to the «Customer Service» page is made, we observe that the page takes a long time to load and eventually displays an error. This indicates that during the execution of the request, packet data substitution was performed, causing the request to be incomprehensible to the server, resulting in an error message being displayed on the screen. Therefore, it is worth turning off the ongoing test in Clumsy by clicking the «Stop» button and returning to the site by refreshing the page, as the site will reopen.
You can see the described process in the GIF animation below.
How to block a specific IP in Clumsy?
To block a specific IP, you need to add the following text to the rule description line:
ip.DstAddr == 10.4.2.110 or ip.SrcAddr == 10.4.2.110.
The IP can be anything, the line above gives a random example. If the description is entered manually, the rule will not be automatically set in the «Presets» list.
Features of working with Clumsy
- In order for a particular function to work constantly, set the «Chance (%)» parameter to 100% or a value close to it.
- Multiple functions can be used simultaneously to observe their impact on the network, close to real conditions.
- Even if the user is not connected to the network, but Clumsy is running, the program still functions.
- Clumsy works with any applications loaded in the system.
Conclusion
Having considered the Clumsy program in this article, we can say that it is quite a good option for simulating a «poor» network, so-called non-ideal conditions, which are quite a common phenomenon. It is fairly easy to use, which is definitely an advantage, and at the same time, it offers sufficient functionality to be helpful for testers, network administrators, or even developers.


